
Getting Started with Link Surge
Jump to the part you need: desk phone basics, mobile app setup, the web client, or quick troubleshooting.
Get Started
Welcome to Link Surge! You can use your extension in several different ways. Please refer to your Welcome Email for your extension number, temporary password, and QR code. Below are the three main ways to connect:
1. Desk Phone
Your desk phone is pre-configured with your extension. Simply connect it to power and internet.
- The phone will automatically provision with your account. If it does not provision after a reboot, please contact support.
- Check voicemail by pressing the Voicemail button (you can also access voicemail by dialing the feature code if provided).
- Use the dedicated buttons for Transfer, Hold, and Conference to manage calls.
- If your phone has multiple lines, you can use them for your own private call flow to place calls on hold, park calls privately, or manage simultaneous conversations.
2. Mobile Client
Install the Linkus Mobile app on your smartphone to make and receive calls from anywhere.
- Download from the App Store (iOS) or Google Play (Android).
- Scan the QR Code in your Welcome Email to log in instantly.
3. Web Client
Access your extension from any modern browser (Chrome, Edge, Safari, or Firefox).
- Your login page is
yourcompany.ras.yeastar.com(replace yourcompany with your business name). - Enter your extension number and temporary password from the Welcome Email.
- After logging in, bookmark the page for quick access.
Desk Phone Quick Start Guide (Yealink T54W)
This guide is written for the Yealink T54W, but the concepts and most of the steps apply to nearly all modern desk phone models — other Yealink models, Grandstream, Fanvil, and similar. Button placement and menu names may differ slightly on your model, but the features work the same way. If your phone does not automatically provision after a reboot, please contact support.
1. Overview
Your desk phone is pre-provisioned with your extension and should work automatically once powered and connected to the network. The display will show your name in the top left. If your phone has multiple lines, you can use them for your own private call flow to place calls on hold, park calls privately, or manage simultaneous conversations.
2. Function Keys
The buttons on the right side of the display are customizable function keys. You can assign these keys from the Web Client by going to Preferences → Function Keys, or directly on the phone by pressing and holding the desired button.
Popular function key options include:
- Busy Lamp Field (BLF): monitor another extension’s status (idle, ringing, busy).
- Speed Dial: call frequent contacts with a single press.
- Call Park: place a call in a shared parking slot to retrieve from another phone.
- Direct Pickup: answer a ringing call for another extension.
- Do Not Disturb (DND): send calls directly to voicemail without ringing.
3. Built-in Buttons
Dedicated hardware buttons make common features quick to access:
- 🎧 Headset Toggle: switch between handset, speaker, and headset modes.
- 🔇 Mute: silence your microphone during a call.
- 📨 Voicemail: press to access your mailbox directly.
- ⏸️ Hold: place the active call on hold, press again to resume.
- 🔀 Transfer: move the current call to another extension or number.
- ↩️ Redial: view recent call history and redial the last number.
- 📢 Speakerphone: activate hands-free calling.
- 🔊 Volume: rocker button below keypad adjusts call and ringer volume.
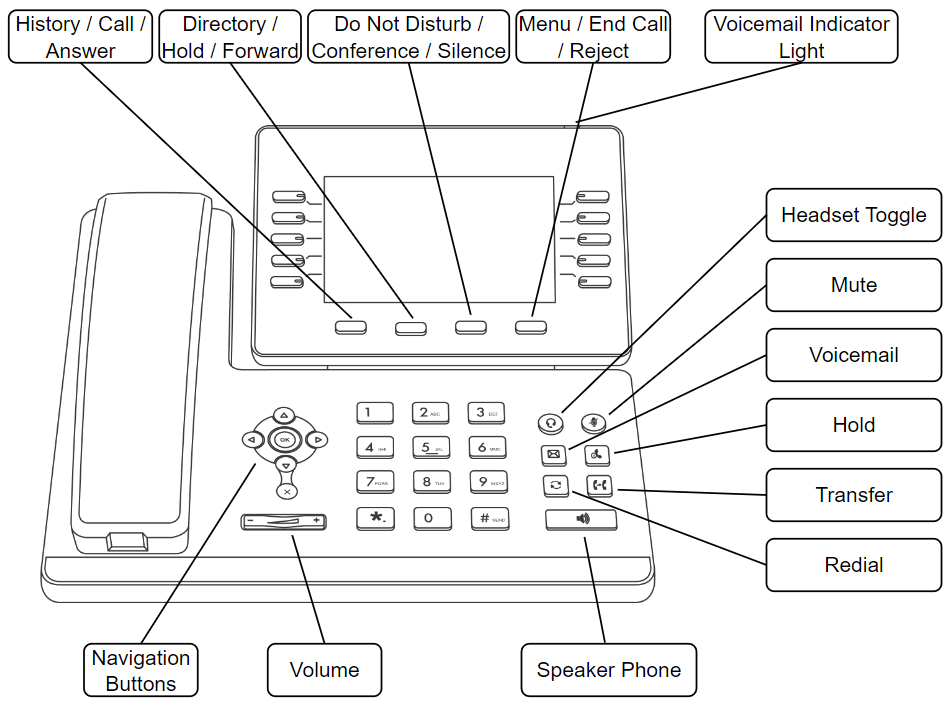
For the full list of available feature codes, please refer to the Feature Codes List.
4. Voicemail
Your personal voicemail: press the Voicemail (envelope) button, or dial the
feature code *2. You will be prompted for your PIN.
Group voicemail: if your team uses a shared group mailbox, press the
Voicemail (envelope) button or dial *2 followed by the group voicemail number
— for example, *2700 for group mailbox 700.
PIN: the default voicemail PIN is 1234. We strongly recommend changing it.
To change it, log in to your voicemail and follow the prompts in the voicemail menu to set a new PIN.
A note on greetings: in most cases you only need to record the default greeting and, if you use it, the Do Not Disturb greeting. The voicemail menu will offer greetings for several other statuses (away, business trip, lunch break, and so on) — these can be safely ignored unless you actively set your presence status from the mobile app or web client.
5. Call Handling
Transfer: During a call, press the Transfer button, dial the extension/number, then press Transfer again to complete. You can also perform an attended transfer by speaking with the recipient first.
Forwarding: For automatic forwarding of all calls, configure this in the Web Client or from the phone menu. Forwarding sends calls before you answer, while Transfer moves an active call.
Parking: Calls can be placed in a shared “parking slot” using a Call Park key. Another user can retrieve the parked call from their phone. With multiple lines on your phone, you can also park calls privately to return to later.
6. Conference Calling
To start a conference, press the Conference button while on a call, dial the second participant, then press Conference again to join all callers.
7. Light Indicators
Line keys and BLF keys use LED lights to indicate status:
- Green: line is idle or BLF extension is available.
- Red: line is in use or BLF extension is busy.
- Blinking Red: ringing call or waiting voicemail.
8. Phone Settings
Press the Menu button (bottom right of the phone) to access settings. Use the arrow keys to navigate to Basic Settings and press OK.
From here, you can:
- Change the display language.
- Adjust screen brightness and wallpaper.
- Configure ringtone and volume preferences.
- Connect to Wi-Fi networks (see section 9).
- Pair Bluetooth headsets or devices (see section 10).
- Enable phone lock for security.
- Check network information and IP address.
9. Connecting to Wi-Fi
The T54W has Wi-Fi built in, so it can be used in locations without a network drop. A wired Ethernet connection is still recommended wherever possible — it gives noticeably more reliable call quality.
- Unplug the Ethernet cable from the phone, if one is connected.
- Press the Menu soft key.
- Navigate to Basic → Wi-Fi and press OK.
- Set Wi-Fi to On and save. The phone will scan for nearby networks.
- Open Available Network(s), highlight your network, and press Connect.
- Enter the Wi-Fi password and press OK to save.
Once connected, a Wi-Fi icon appears in the status bar at the top of the screen. Give the phone a minute to re-register with the phone system — your name should reappear in the top left. If it doesn't, reboot the phone. If your network hides its name, choose Known Network(s) → Add and enter the SSID, security type, and password manually.
Guest and public Wi-Fi networks that require accepting terms on a web page won't work, since the phone has no browser. The phone needs a standard password-protected network.
10. Pairing a Bluetooth Headset
The T54W has Bluetooth built in and works with most wireless headsets and earbuds, including AirPods.
- Press the Menu soft key.
- Navigate to Basic → Bluetooth and press OK.
- Set Bluetooth to On and save.
- Put your headset into pairing mode, then select Scan or Available Devices on the phone.
- Highlight your headset in the list and press Connect.
For AirPods specifically: leave the AirPods in their charging case, open the lid, then press and hold the button on the back of the case until the status light blinks white. They will then appear in the phone's scan list.
Once paired, press the Headset button on the phone to route calls to your headset. Press it again to return to the handset or speaker.
Bluetooth earbuds pair to one device at a time, so your AirPods will disconnect from your phone or laptop while connected to the desk phone. If they stop appearing in the scan list, remove them from the phone's paired device list and pair again.
Mobile App Quick Start Guide
We use the Linkus Mobile app to connect your smartphone to your phone system. Once set up, you can place and receive calls with your business number, see missed calls, and check voicemail from anywhere.
1. Download the App
Install the Linkus Mobile Client from your device's app store:
- iPhone / iPad: Download on the App Store
- Android: Get it on Google Play
2. Sign In With Your Welcome Email
Your Welcome Email has everything you need to sign in.
Need access? To request the mobile app, contact your account manager or email support@linksurgenetworks.com with your name, email address, and extension number, and we'll send your Welcome Email.
Your Welcome Email is only valid for one day. Please set up the app soon after you receive it — if it expires, just reach out and we'll send a new one.
Once you have your Welcome Email:
- Open the Linkus app and tap the QR code scan button in the top-right corner.
- Scan the QR code from your Welcome Email. This autofills your username/extension, password, and SN/domain.
- Tap Accept on the privacy policy, then reset your password when prompted.
- Sign in again using your new password.
Once you're signed in, incoming calls will ring both your desk phone and your mobile app at the same time. You can answer on whichever device is closest.
A couple of things to know as you get set up:
- Contact syncing: if prompted, we recommend declining, so your personal contacts aren't used on your business phone system.
Forgot your password? Contact your system administrator or your account manager and we can reset it for you.
3. Microsoft or Google Sign-In
Larger deployments may use Microsoft or Google authentication instead. If so, tap one of the two buttons at the bottom of the login screen and sign in through that account. Smaller deployments typically don't use these.
4. Notifications
Push notifications are what alert you to incoming business calls when the app isn't open. If you'd rather not be reachable on your personal phone outside of work hours, you can turn them off in one of two places.
From inside the Linkus app:
- Tap the Calls tab in the bottom left.
- Tap your account picture in the top left.
- Find the Stop Push Notifications setting and toggle it.
From your phone's settings: you can also control notifications at the operating system level, which overrides the app.
- iPhone: Settings → Notifications → Linkus → turn off Allow Notifications.
- Android: Settings → Apps → Linkus → Notifications → turn notifications off.
Both platforms also let you keep notifications on but change how they appear — silencing sounds, hiding previews from your lock screen, or allowing them only during certain hours.
With notifications off, you won't be alerted to incoming calls on your mobile app unless it's open on screen. Your desk phone will still ring, and calls will still reach your voicemail — you'll see them in your missed calls list the next time you open the app.
5. Using the App
From your mobile app, you can:
- Make and receive calls using your business phone number.
- View missed calls and call history.
- Check your voicemail.
- Look up coworkers in the Directory tab, which lists every extension on your phone system. Tap a name to call that extension directly.
You can ignore the Chat tab. It isn't typically used and is not related to business texting.
Web Client Quick Start Guide
The Linkus Web Client lets you use your extension from any computer with a modern browser — nothing to install. It's a good fit if you work from a laptop, and a handy backup when you're away from your desk phone.
1. What You Need
- A modern browser: Chrome, Edge, Safari, or Firefox (Chrome or Edge recommended).
- A headset, or a working microphone and speakers.
- Your Welcome Email, which has your extension number and temporary password.
2. Sign In
Your login page is yourcompany.ras.uccpbx.com — replace yourcompany with your
business name. The exact address is also included in your Welcome Email.
Need access? To request an account, contact your account manager or email support@linksurgenetworks.com with your name, email address, and extension number, and we'll send your Welcome Email.
Your Welcome Email is only valid for one day. Please sign in soon after you receive it — if it expires, just reach out and we'll send a new one.
Once you have your Welcome Email:
- Go to your login page in your browser.
- Enter your extension number as the username, along with the temporary password from your Welcome Email.
- Accept the privacy policy, then reset your password when prompted.
- Sign in again using your new password.
- Bookmark the page so it's easy to get back to each day.
Once you're signed in, incoming calls will ring your desk phone, your mobile app, and the web client at the same time. Answer on whichever device is closest.
Forgot your password? Contact your system administrator or your account manager and we can reset it for you.
3. Microsoft or Google Sign-In
Larger deployments may use Microsoft or Google authentication instead. If so, use one of the two sign-in buttons on the login page and authenticate with that account rather than an extension and password. Smaller deployments typically don't use these.
4. Allow Microphone and Notifications
The first time you sign in, your browser will ask for permission to use your microphone and to show notifications. Please allow both — without microphone access you won't be able to talk on calls, and without notifications you won't see incoming call pop-ups when the tab is in the background.
- If you accidentally blocked either one, click the padlock icon in the address bar, re-enable it, then refresh the page.
- Keep the tab open while you're working so you don't miss calls.
If your headset has its own mute switch, remember it works independently of the mute button in the web client. If callers can't hear you, check both.
5. Using the Web Client
From the web client, you can:
- Make and receive calls using your business phone number.
- View missed calls and call history.
- Listen to and manage your voicemail.
- Transfer, hold, and start conference calls during an active call.
- Look up coworkers in the Contacts or Extensions list, which shows every extension on your phone system along with whether each person is available or on a call.
- Set your presence status, and customize your function keys under Preferences → Function Keys — the same keys that appear on your desk phone.
You can ignore the Chat tab. It isn't typically used and is not related to business texting.
Troubleshooting & Support
Use this guide to resolve common issues with your desk phone, web client, or Linkus apps. If the steps below don’t solve the problem, follow the Support & Escalation instructions at the end.
1. Desk Phone
- No dial tone: Confirm power and network (Ethernet/PoE or Wi-Fi if supported). Try a different cable/port.
- Phone didn’t provision: Reboot the phone after confirming network is live. If it still doesn’t provision, escalate below.
- Buttons not responding: Reboot the phone. If persistent, check for a firmware update (or escalate).
- Audio issues: Check handset/headset connections and raise volume with the rocker below the keypad.
2. Web Client
- Can’t log in: Verify the URL is
yourcompany.ras.yeastar.com(replace yourcompany with your business name). Double-check your extension and password from the Welcome Email. - Browser errors or poor audio: Use Chrome, Edge, Safari, or Firefox. Allow microphone access and clear cache/cookies if needed.
3. Mobile & Desktop App
- QR code won’t scan: Confirm you’re using the official Linkus app and try again in good lighting. You can also log in manually using your extension and password.
- No ringing on mobile: Ensure notifications/background permissions are enabled for Linkus.
- Choppy calls: Check Wi-Fi/cellular strength; prefer a stable network.
4. Voicemail & PIN
- Forgotten PIN: Log in to the Web Client → Settings → Voicemail → Change PIN.
- Can’t access voicemail: Use the Voicemail button on your phone or dial the voicemail feature code (see your Welcome Email).
- Mailbox full: Delete or download old messages; consider enabling voicemail-to-email.
5. Support & Escalation
- Contact your Company IT or Administrator first. Many issues (network, device access, headsets) are resolved quickest internally.
- Submit a support request: email support@linksurgenetworks.com with a brief description, your extension, and screenshots if available.
- Emergencies: call our support number (see your Welcome Email or account paperwork). For urgent outages, phone is fastest.
Include impact (who’s affected), when the issue started, and any error messages. This helps us resolve it quickly.