Getting Started with Link Surge
Jump to the part you need: connecting your extension, first-time setup, desk phone basics, or quick troubleshooting.
How to Connect
Welcome to Link Surge! You can use your extension in several different ways. Please refer to your Welcome Email for your extension number, temporary password, and QR code. Below are the three main methods to connect:
1. Desk Phone
Your desk phone is pre-configured with your extension. Simply connect it to power and internet.
- The phone will automatically provision with your account. If it does not provision after a reboot, please contact support.
- Check voicemail by pressing the Voicemail button (you can also access voicemail by dialing the feature code if provided).
- Use the dedicated buttons for Transfer, Hold, and Conference to manage calls.
- If your phone has multiple lines, you can use them for your own private call flow to place calls on hold, park calls privately, or manage simultaneous conversations.
2. Web Client
Access your extension from any modern browser (Chrome, Edge, Safari, or Firefox).
- Your login page is
yourcompany.ras.yeastar.com(replace yourcompany with your business name). - Enter your extension number and temporary password from the Welcome Email.
- After logging in, bookmark the page for quick access.
3. Desktop & Mobile App
Install the Linkus UC Softphone to make and receive calls from anywhere.
- Mobile App: Download from the App Store (iOS) or Google Play (Android).
- Desktop App: Download from Yeastar.com.
- Scan the QR Code in your Welcome Email to log in instantly.
Desk Phone Quick Start Guide (Yealink T54W)
This guide is designed for the Yealink T54W desk phone but applies to most modern desk phones. If your phone does not automatically provision after a reboot, please contact support. If your phone has multiple lines, you can use them for your own private call flow to place calls on hold and manage conversations more flexibly.
1. Overview
Your desk phone is pre-provisioned with your extension and should work automatically once powered and connected to the network. The display will show your name in the top left. If your phone has multiple lines, you can use them for your own private call flow to place calls on hold, park calls privately, or manage simultaneous conversations.
2. Function Keys
The buttons on the right side of the display are customizable function keys. You can assign these keys from the Web Client by going to Preferences → Function Keys, or directly on the phone by pressing and holding the desired button.
Popular function key options include:
- Busy Lamp Field (BLF): monitor another extension’s status (idle, ringing, busy).
- Speed Dial: call frequent contacts with a single press.
- Call Park: place a call in a shared parking slot to retrieve from another phone.
- Direct Pickup: answer a ringing call for another extension.
- Group Pickup: answer calls for a call group you belong to.
- Do Not Disturb (DND): send calls directly to voicemail without ringing.
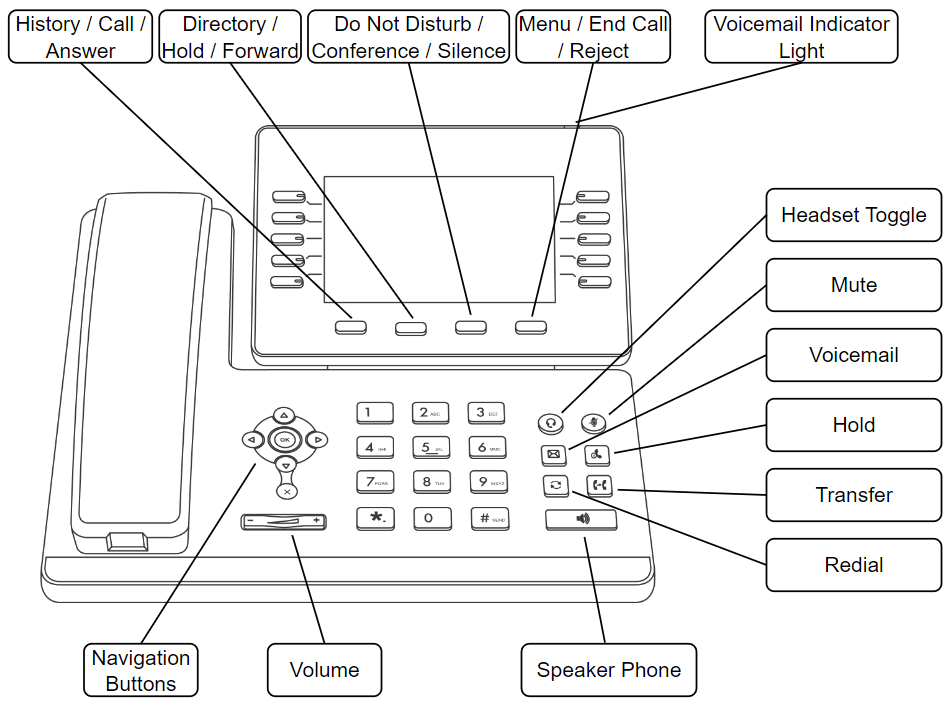
3. Built-in Buttons
Dedicated hardware buttons make common features quick to access:
- 🎧 Headset Toggle: switch between handset, speaker, and headset modes.
- 🔇 Mute: silence your microphone during a call.
- 📨 Voicemail: press to access your mailbox directly.
- ⏸️ Hold: place the active call on hold, press again to resume.
- 🔀 Transfer: move the current call to another extension or number.
- ↩️ Redial: view recent call history and redial the last number.
- 📢 Speakerphone: activate hands-free calling.
- 🔊 Volume: rocker button below keypad adjusts call and ringer volume.
For the full list of available feature codes, please refer to the Feature Codes List.
4. Voicemail
To check voicemail, press the Voicemail button or dial the voicemail feature code provided in your Welcome Email. You will be prompted for your PIN. The first time you log in, you may be required to set a new PIN.
You can also access voicemail by dialing the feature code *2.
To change your voicemail PIN later: log in to the Web Client → Settings → Voicemail → Change PIN.
5. Call Handling
Transfer: During a call, press the Transfer button, dial the extension/number, then press Transfer again to complete. You can also perform an attended transfer by speaking with the recipient first.
Forwarding: For automatic forwarding of all calls, configure this in the Web Client or from the phone menu. Forwarding sends calls before you answer, while Transfer moves an active call.
Parking: Calls can be placed in a shared “parking slot” using a Call Park key. Another user can retrieve the parked call from their phone. With multiple lines on your phone, you can also park calls privately to return to later.
6. Conference Calling
To start a conference, press the Conference button while on a call, dial the second participant, then press Conference again to join all callers.
7. Light Indicators
Line keys and BLF keys use LED lights to indicate status:
- Green: line is idle or BLF extension is available.
- Red: line is in use or BLF extension is busy.
- Blinking Red: ringing call or waiting voicemail.
8. Phone Settings
Press the Menu button (bottom right of the phone) to access settings. Use the arrow keys to navigate to Basic Settings and press OK.
From here, you can:
- Change the display language.
- Adjust screen brightness and wallpaper.
- Configure ringtone and volume preferences.
- Connect to Wi-Fi networks (if supported).
- Pair Bluetooth headsets or devices (if supported).
- Enable phone lock for security.
- Check network information and IP address.
First-Time Setup
After you receive your Welcome Email, complete the steps below to secure your account and get your extension ready for everyday use.
1. Change your password
Replace the temporary password from your Welcome Email with a new strong password.
- Sign in to the Web Client at
yourcompany.ras.yeastar.com(replace yourcompany with your business name). - Open Top right → Your name → Change Password & Security.
- Create a strong password and save it in your password manager.
2. Change your voicemail PIN
Your voicemail PIN is required when checking messages from a desk phone. Update it on first login.
- In the Web Client: Settings → Voicemail → Change PIN.
- Or from your desk phone: press the Voicemail button or dial the voicemail feature code and follow the prompts (you can also access voicemail by dialing the feature code * if provided for your system).
- If your Welcome Email lists a different default code (e.g., *2), use that for first access.
3. Bookmark the Web Client
Save your login page so it’s one click away.
- After you sign in, bookmark
yourcompany.ras.yeastar.comin your browser. - Pin it to the Bookmarks Bar for faster access.
4. Optional: enable two-factor authentication (2FA)
Turn on 2FA for added protection when signing in.
- Open Top right → Change Password & Security → Security Settings.
- Enable two-factor authentication and follow the on-screen steps.
Troubleshooting & Support
Use this guide to resolve common issues with your desk phone, web client, or Linkus apps. If the steps below don’t solve the problem, follow the Support & Escalation instructions at the end.
1. Desk Phone
- No dial tone: Confirm power and network (Ethernet/PoE or Wi-Fi if supported). Try a different cable/port.
- Phone didn’t provision: Reboot the phone after confirming network is live. If it still doesn’t provision, escalate below.
- Buttons not responding: Reboot the phone. If persistent, check for a firmware update (or escalate).
- Audio issues: Check handset/headset connections and raise volume with the rocker below the keypad.
2. Web Client
- Can’t log in: Verify the URL is
yourcompany.ras.yeastar.com(replace yourcompany with your business name). Double-check your extension and password from the Welcome Email. - Browser errors or poor audio: Use Chrome, Edge, Safari, or Firefox. Allow microphone access and clear cache/cookies if needed.
3. Mobile & Desktop App
- QR code won’t scan: Confirm you’re using the official Linkus app and try again in good lighting. You can also log in manually using your extension and password.
- No ringing on mobile: Ensure notifications/background permissions are enabled for Linkus.
- Choppy calls: Check Wi-Fi/cellular strength; prefer a stable network.
4. Voicemail & PIN
- Forgotten PIN: Log in to the Web Client → Settings → Voicemail → Change PIN.
- Can’t access voicemail: Use the Voicemail button on your phone or dial the voicemail feature code (see your Welcome Email).
- Mailbox full: Delete or download old messages; consider enabling voicemail-to-email.
5. Support & Escalation
- Contact your Company IT or Administrator first. Many issues (network, device access, headsets) are resolved quickest internally.
- Submit a support request: email support@linksurgenetworks.com with a brief description, your extension, and screenshots if available.
- Emergencies: call our support number (see your Welcome Email or account paperwork). For urgent outages, phone is fastest.
Include impact (who’s affected), when the issue started, and any error messages. This helps us resolve it quickly.